Playlist of my current renders, which include weapon designs and other models:
http://www.youtube.com/watch?v=galpFaITWSo&list=PLkvbvmI8r2cku4vAafFbUV4yLkdc239Wf
Thursday, March 28, 2013
Friday, March 8, 2013
Beach House
I'm going to work on texturing this beach house next. It will be an in-game asset, so the textures won't need to be realistic. I won't leave the flat colors, though. I'll try and bring this into Vue10x to get a beach created for a good render.


Prelude renders
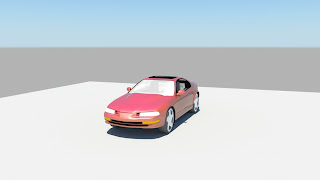
After working with image-based lighting, I managed to get a good, solid render of the Prelude.


After that, I tried a different environment. Not working as well, but it could eventually work out.

Here the renders are side-by-side.

Wednesday, February 27, 2013
Warcraft Style Weapon creation
I sketched out some weapon designs to begin modeling last week.

Here's the 2-handed battle axe

1-handed caster mace

1-handed axe

2-handed battle mace, dubbed "The Pen"
(get it?)

2-handed sword.

Keep in mind, these are just the base meshes, so they are very rough and untextured.
Thursday, February 21, 2013
Car Render
I've been working with image-based lighting to get a photorealistic render of the Prelude, using a tutorial on DigitalTutors.com.
.png)
.png)
Here is a before rendering:
.png)
Here's the after rendering:
.png)
I need to still work on the texture files for the glass to remove the grainy look to it, as well as work on the overly-shiny tires.
Thursday, February 14, 2013

Sunday, February 10, 2013
Back to the Prelude
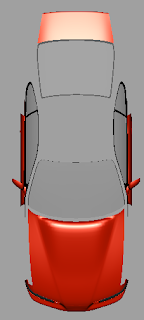
I finished the major components of the Prelude thus far. Here are a few renders of the vehicle with stock mentalray lighting.


Turntable video:
Wednesday, January 30, 2013
Updated UV Maps
Continuing on the trend of texturing the building, I completed getting the UVs set up for texturing on the entire building. In doing this I had to shrink part of it down, and in doing so had to go into the file in Photoshop and move/shrink the texture to fit the new placement of the UVs.
Here is the current UV setup:


Here is the current UV setup:

UV Map w/o texture.

UV Map w/texture.
Saturday, January 26, 2013
Building UVing Update
Today I've been working with the UVs on the building. I combined most of the building together into one mesh, moving around the UVs to fit into one scene. There is still one beam in that section of the building I haven't fixed the UVs on so that a texture is applied, but once I do that it'll all be set and ready for the rest of the building. Here are some shots of what I've done.


UV Map in Maya

Edited UV Map in Photoshop

Map applied in Maya

Rendered shot with map in place

Rendered shot with map in place
Thursday, January 24, 2013
Current work on abandoned building
I decided to have it look roughed up by more than just time by adding pieces of my Mech model into the scene. here are a couple playblast/render videos of the scene so far.
Tuesday, January 22, 2013
Abandoned Building Compilation
Taking a break from my Prelude model, I am going to put together a scene with an abandoned, run down building that is sinking into water. In the scene will also be pieces of the Mech model I created in Modeling 1, as well as pieces of the Prelude model, all broken up and rusted, as if they've been there a while. I will have to work on modeling, texturing, lighting, and creating a turntable of the scene. I may have different variations of it, especially if I decide to move pieces around in more interesting manners.
Here is the photos I will be referencing for the building:


Here is the building so far:


Here is the photos I will be referencing for the building:


Here is the building so far:


Tuesday, January 15, 2013
Example Demo Reels
Taking a quick break from posting updates on the Prelude to post video examples of 3D Artist demo reels that I find interesting and helpful:
Saturday, January 12, 2013
Front Bumper, headlights, and front vents
Next up was the front bumper. This took me the longest, as there were a TON of curves and holes, which made it very, very difficult.


Next, I crafted the headlights and intake vents next to the lights.


Here are a couple screenshots and a couple renders of it together so far:


Prelude: Everything together so far
After Mirroring Geometry and moving stuff around, I got the basic shape of the vehicle's frame together with the pieces I've crafted thus far.


I added in a side skirt just below the door to give myself an idea of how low the body needs to go, and may/may not keep it there (depending on final product).


Next up will be to get glass into the frames and craft a windshield and rear windshield.
Prelude: Trunk & License Plate Frame
Next up I modeled the trunk cover and license plate section. Both were pretty easy to do, started with a square, added some edge loops and worked with extrusions and such.


Some of the polygons in the license plate frame are a bit...well...funky. I'll go in and fix them at a later time.


Once again I was trying to match up the vertices on the trunk to the license plate section. I hope I can keep it that way when I go back and fix the polygons.

Side-View Mirror and Window Trim
Next up I worked on the side-view mirror. This was rather difficult, as the photos that I found for the mirror didn't really have a 3d view on them. Most of the tweaking I did from memory of my old Prelude's mirror.


I think I stretched the point on where it attaches to the door trim a bit much, but can go back and tweak that if I need to later.

As far as the trim goes, it was pretty easy to do. Started off with one plane, and extruded the rest. I had to have some of them have only 3 vertices to match shape, but I don't see that being much of a problem.


This is what they look like put together with the door:


Subscribe to:
Posts (Atom)